File Server Migration to Server 2012 Part 4: File Screening
Now that we're getting into setting up our features and such, things are starting to get a little bit interesting (of course, this depends on your definition of the word "interesting"). With Deduplication, we've saved a notable amount of space on our file server. Now, let's make configure a File Screening Policy to make sure our users can't save files that have no business need being on the server.
File Screening, or rather a File Screen Policy is something that can be setup in the File Server Resource Manager. Other things can be setup in FSRM but in this post we're going to look specifically at File Screening.
A File Screen Policy is essentially a rule for the file server that a certain type of file (be it a single specific extension or a group of files like audio/video files) can't be saved to the server. A File Screen policy can be setup to block saving of file types on an entire volume or just a specific directory. In addition to blacklisting a set of file types, it can also be configured to whitelist certain file types as well.
File servers sound super simple and very boring when you're in a lab environment, whether it's school or home. However, the file server is an important deal to users. If you have any professional IT experience under your belt you know this first hand and you also know that most production file servers are a mess. Numerous copies of the same files, an insane folder structure, unreasonable permissions settings ("I know this is on our main file share that all departments have access to but I need this folder to be accessible to only myself, Michelle and Bill, ok? Thanks." - Every secretary, assistant and manager ever) are only a few of the things that you'll see daily.
While piss-poor organization and the breaking inheritance on permissions can be stopped by putting a proverbial foot down, it's not uncommon to see users storing files that have nothing to do with their job or any business function at all. I've seen entire music collections saved in users' personal drives and 5 episodes of The Boondocks hidden in a directory cleverly hidden in an "Accounting" directory. Not every business will benefit from the same File Screen Policies but any IT department will have more control over and better visibility into their file server storage.
To get started, we'll need to install the File Server Resource Manager which is a role service under File and iSCSI services (partly installed by default). Once you've selected FSRM, clicked Next a few times and waited for the installation to complete, we're ready to continue.
To open FSRM, just click Start and begin typing "file server" it should be the only thing that'll come up. Once it's open, you'll see that it's pretty similar to most MMCs you've used for other things. Navigation on the left, information in the middle and actions on the right. FSRM is also what you'd use to configure/manage quota management (limiting how much storage users can use), classification management (very powerful stuff if it's setup properly), etc. Expand "File Screening Management" and you'll see options for your configure screens (which should be empty), file screen templates (which includes a few MS-made templates) and File Groups (where you define what extensions are considered a given group).
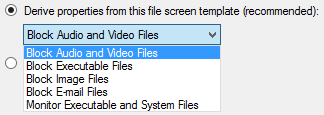
If you right-click on "File Screens" and select "Create File Screen", you can get started. You'll need to choose a directory or volume that this screen policy will apply to. In my case, I'm setting up a screen policy on my E:\ drive and I've chosen to block Audio and Video files.
File Screening, or rather a File Screen Policy is something that can be setup in the File Server Resource Manager. Other things can be setup in FSRM but in this post we're going to look specifically at File Screening.
A File Screen Policy is essentially a rule for the file server that a certain type of file (be it a single specific extension or a group of files like audio/video files) can't be saved to the server. A File Screen policy can be setup to block saving of file types on an entire volume or just a specific directory. In addition to blacklisting a set of file types, it can also be configured to whitelist certain file types as well.
File servers sound super simple and very boring when you're in a lab environment, whether it's school or home. However, the file server is an important deal to users. If you have any professional IT experience under your belt you know this first hand and you also know that most production file servers are a mess. Numerous copies of the same files, an insane folder structure, unreasonable permissions settings ("I know this is on our main file share that all departments have access to but I need this folder to be accessible to only myself, Michelle and Bill, ok? Thanks." - Every secretary, assistant and manager ever) are only a few of the things that you'll see daily.
While piss-poor organization and the breaking inheritance on permissions can be stopped by putting a proverbial foot down, it's not uncommon to see users storing files that have nothing to do with their job or any business function at all. I've seen entire music collections saved in users' personal drives and 5 episodes of The Boondocks hidden in a directory cleverly hidden in an "Accounting" directory. Not every business will benefit from the same File Screen Policies but any IT department will have more control over and better visibility into their file server storage.
To get started, we'll need to install the File Server Resource Manager which is a role service under File and iSCSI services (partly installed by default). Once you've selected FSRM, clicked Next a few times and waited for the installation to complete, we're ready to continue.
To open FSRM, just click Start and begin typing "file server" it should be the only thing that'll come up. Once it's open, you'll see that it's pretty similar to most MMCs you've used for other things. Navigation on the left, information in the middle and actions on the right. FSRM is also what you'd use to configure/manage quota management (limiting how much storage users can use), classification management (very powerful stuff if it's setup properly), etc. Expand "File Screening Management" and you'll see options for your configure screens (which should be empty), file screen templates (which includes a few MS-made templates) and File Groups (where you define what extensions are considered a given group).
By default, you'll see that there are templates premade to block Audio/Video files, Executable files, Image files, Email files, and a template to monitor executable and system files.
To dig a bit deeper, choose the "Define custom file screen properties" option. You'll see that there's a lot of things you can tweak. You can setup the screening type, email notifications, what gets put into the event log, you can run a command/script if something triggers the screening policy or have the server generate various types of reports. Let's take a look at these.
The first thing you'll notice is the two screening types; Active or Passive. The Properties window explains it pretty well. An Active screen policy will stop the user from saving the files that triggered the screen policy. A Passive screen polity will simply taddle on them (and you can define HOW your policy taddles on them but we'll get to that). What you also see is that you can select specific file groups (Audio and Video Files, Email Files, etc) but you can select a group and click the "Edit" button to define exactly what extensions that file group includes.
If you click on the Email Tab, you can craft an email to be sent to whomever you want to notify when a policy has been triggered. You can also send an email directly to the user who triggered the policy. (SMTP options can be setup by clicking Action > Configure Options... on the main screen of FSRM.)
You can opt to have a triggered policy add to the event log and you can customize the event log entries.
You can set the policy to run a command, script or program upon triggering as well.
Lastly, you can setup this screen to generate various reports and whatnot.
Clearly, you've got a lot of options available to you with this. Managing file screen templates and managing file groups is equally easy. Once you know where to go, setting up a file screen policy isn't actually very hard.


Comments
Post a Comment