Modifying the Zebra F-701 & F-402 pens
I've been carrying a pen as part of my (mostly) every-day-carry, or EDC, for a couple years now. I bought the Zebra F-701 and after a few other pen purchases, the 701 is still my favorite of all. At first, I just wanted a pen that looked nice and for the moments I needed to sign something. I recall attending meetings when I worked at the university where the attendees were asked to sign-in on the attendance sheet: I tended to be the only one that didn't have a pen so I felt unprepared when I had to ask one of the other attendees if I could borrow theirs. Once I started college, I found myself using a pen much more often, so it had to be comfortable, relatively inexpensive (nice pens can cost hundreds of dollars), and still stylish enough to live in the pocket of a dress shirt.

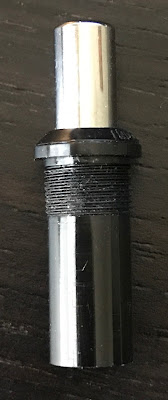
While the FSP refill will fit in the 701 with no modification, it will not work smoothly. In the tip of the pen is a plastic guide for the cartridge. You can get this out with a variety of tools but most people use a paper-clip to push it out from the tip or pull it out from the threaded side.


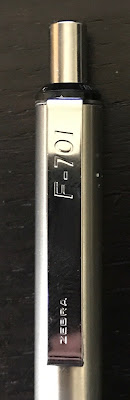


The Zebra F-701 is a very common "nice" pen, along with it's next model down, the F-402. Both are retractable ball-point pens that are metal bodied and are usually less than $10 for a 2 pack, so they're not terribly expensive. I say they're "nice" pens because while they're relatively inexpensive, they're of a much higher quality than the 50-pack of BIC or other disposable pens you may buy. They're modifiable (should you want to), can take aftermarket refills (like Fisher Space pen cartridges or even MontBlanc Rollerball cartridges), and cost a lot less than people think when they see one.
In this post, I'm going to talk about 2 common mods for the Zebra F-701 and the F-402. I'm going to go through what it takes to switch the plunger assemblies (aka, the clickers), the tips (of the pen body, not the ink cartridge/refill) and change out the Zebra ink cartridge for the Fisher Space Pen cartridge. I'm writing this because these mods are relatively common for the 701, but I had questions about modding the 402 as well that many of the other tutorials didn't answer, so I'm going to answer those questions here.
First, let's look at the Fisher Space pen cartridge, which I'll call the FSP refill for the rest of the article. The reason the FSP refill is a popular mod for a lot of pens (the Zebra F series in particular) is because it's simply a better design. Normal ink refills rely on gravity for the ink to come out by way of a bearing at the tip of the pen. The FSP refill is filled with a gas and a float, so as the ink escapes through the ball-point, the gas in the cartridge pushes float, which pushes the ink towards the ball-point, allowing the user to write at angles that a normal pen wouldn't allow. There's an old joke that NASA spent millions of dollars designing a pen that would allow astronauts to write in space: The Russians just used a pencil. The FSP refill is also made out of metal, so using one in your pen will add a little bit of weight to a pen. The Zebra F series pens already feel relatively stout so the added weight makes it feel more premium to many people.
Let's start by putting the FSP refill in a 701. We'll first need to start by disassembling the pen. This is done by unscrewing the tip of the pen body and pulling out the spring and Zebra refill.


Some tutorials will tell you to throw the guide away or trim the smaller end of it with a razor but that will have the metal neck of the FSP refill "klincking" on the tip of the pen body. Trust me when I tell you how annoying that is. For the best results, you'll want to stretch the smaller end of the plastic guide using the FSP refill as shown below.

Once that's done, if that's all you want to do, put the guide back in and reassemble the pen and give it a few test clicks. It should have a smooth action. If it doesn't, stretch the guide a bit more.
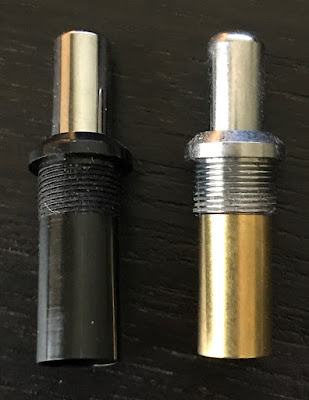
Another relatively common, though more involved, mod for the 701 is to swap out the plunger assembly from the F-402. The 701, has an all metal design except for the plunger assembly (or clicker). The clicker on the 402 is made of metal.
To remove the plunger assembly on the 701, you might be able to just do it with your bare fingers. For me personally, I got some grippy cleaning gloves. Any glove with a rubber palm or rubber inner fingers will work fine. I recommend not using pliers as you can reuse the 701 clicker in the body of the 402.

For the 402, take out the ink refill and go put it in the freezer. The clicker in the 402 is held in with adhesive so we're going to use science to break the adhesive and free the parts for us. Grab a lighter and rubber gloves as well.
After about 20 minutes in the freezer, pull out your 402 and hold it over the lighter so that the heat is being applied to the body, just below the clicker. After about 10-15 seconds, with a gloved hand, unscrew the clicker from the body. The freezer will make the metal contract and the heat will make the metal expand faster than the adhesive, so try not to take too long between pulling it out of the cold and heating and unscrewing.
Voila!

You'll notice that the clicker also holds the pocket clip onto the pen body. The pocket clips from either pen are interchangable so you can keep the one from the 701 or swap it with the one from the 402.
Once you figure out which combo you like better, you can reassemble as you'd like, using the 402 clicker (with or without the pocket clip) on the 701 body.


I'd read a few different tutorials on this mod and many told readers to pitch the 701 clicker and the 402 parts, but none definitively answered whether the 701 clicker would work in the 402 body. I'm here to answer that it does.


However, I've got 3 701s and 2 402s and one of my 701s absolutely would not accept the 402 clicker. I almost stripped out the threads on the inside of the 701 body trying. YMMV.
Another interesting note about these two pens is that the tips are interchangeable as well. However, the opening on the 402 tip is not large enough to accept the FSP refill. However, we already know that the 701 tip does, so there's that.
However, I had to stretch and trim the plastic guide on in the 701 tip as shown below. For trimming the plastic guide, I used my knife and gut off the top lip of the wider opening of the guide. I only had to do this for using the 701 tip on the 402 body with the FSP refill.

For the 402 tip on either pen, I had to use a drill to allow for the FSP refill to be used. A 7/64th bit to be exact. Take the ink refill out first before drilling into the tip of the pen. Start with a 3/32nd bit and then go up to the 7/64th. Once that's done, that 402 tip will work with FSP refills.
Here's a pic of my final franken-pens. From the left, a stock F-701, stock F-402, modded F-701, and modded F-402

For the most part, I carry the modded 701 when I'm more dressed up (dress shirt & slacks) and I carry the modded 402 when I'm a bit more casual (think jeans and a polo).
Hopefully, I've added some new information to the vast number of tutorials. Also, I hope that I've answered some questions about modding these 2 popular models of pens. I've got a couple other pen mod ideas that I'll discuss at some point in the future.
Comments
Post a Comment