vSphere 5.1 upgrade phase 2.5: Upgrading Everything Else
In my last post on my vSphere upgrade project, I wrote about my frustrating experience when upgrading our Windows vCenter install from v5.1 to v5.5. In this post, I'll talk about upgrading everything else. vCenter, while important, it's certainly not the only aspect of a vSphere install. You've also got VMware Update Manager (VUM), ESXi (the hypervisor installed on your host servers), your VMTools installs on your VMs and your virtual hardware version. Let's get started because we've got a lot to cover.
In case you can't tell from the other sections of this post, VUM is pretty important for the rest of this phase of our vSphere upgrade project. VUM is to a vSphere infrastructure what air-conditioning is to your home; You could live with out it but life's so much more comfortable with it. For a Windows vCenter server, you can install VUM on the same server as you did vCenter. A single VUM install can only serve one vCenter install so if you have multiple vCenter servers, you'll need to setup each VUM instance for each vCenter. In my scenario, I'm going to be uninstalling VUM v5.1 from my current vCenter server and installing VUM v5.5 on a separate server since I'm planning on migrating to the VCSA, a Linux-based appliance which can't directly run VUM as of yet.
There's a bit of pre-requisite work we'll need to do before we get around to actually installing our latest version VUM. VUM needs a database to store it's information. In fact, in my scenario since I'm upgrading, I've already got a DB for it to talk to on one of our SQL servers. On the new server where I'm going to run VUM, I'll need to setup a 32-bit DSN to talk to the DB. I had to install the SQL Server 2008 R2 Native Client on my new VUM server. If you have to as well, I'll save you the google and include the link HERE.
I didn't have to make service account as one was already created but I did have to give it a new password, give it Administrator privileges in vCenter AND the server running VUM. I had to make sure my service account had the DB Owner role for the database. I also had to give the VUM server a small amount of disk space to store patches & updates. If you're wondering how much space you'll need for VUM data VMware has a handy size estimator tool you can use.
Once you've got your DB made, service account permitted and your DSN made, you're ready to install or upgrade VUM. The install is pretty straight-forward. You'll specify the vCenter server information (you can use IP Address but I prefer to use a FQDN where possible) and the account credentials you want VUM to use to talk to vCenter, choose your DSN you made, choose how VUM looks on the network, set the paths for installation and patch storage (for which I made a small 10Gb V-for-VUM disk attached to the server), next, install, etc.
VUM doesn't have full functionality in the web-client so you'll need to open up the fat-client and use that. From the menu-bar at the top, click Plug-ins > Manage Plug-ins and you should see VMware Update Manager as an available plug-in. You can download & install it, which is also relatively uneventful. You'll likely see an error after installing the client plug-in. VUM for some reason installs and runs under a local system account on your VUM server so you'll see an error message complaining about connecting to VUM because the DB is unavailable. This is easily resolved by stopping the VUM service on your VUM server, setting the service to logon as your service account and then starting the service again. Head back into your plug-in manager in your vCenter fat-client, right-click the VUM plug-in and enable it. All's right in the world now.
Installing & Configuring VUM
In case you can't tell from the other sections of this post, VUM is pretty important for the rest of this phase of our vSphere upgrade project. VUM is to a vSphere infrastructure what air-conditioning is to your home; You could live with out it but life's so much more comfortable with it. For a Windows vCenter server, you can install VUM on the same server as you did vCenter. A single VUM install can only serve one vCenter install so if you have multiple vCenter servers, you'll need to setup each VUM instance for each vCenter. In my scenario, I'm going to be uninstalling VUM v5.1 from my current vCenter server and installing VUM v5.5 on a separate server since I'm planning on migrating to the VCSA, a Linux-based appliance which can't directly run VUM as of yet.
There's a bit of pre-requisite work we'll need to do before we get around to actually installing our latest version VUM. VUM needs a database to store it's information. In fact, in my scenario since I'm upgrading, I've already got a DB for it to talk to on one of our SQL servers. On the new server where I'm going to run VUM, I'll need to setup a 32-bit DSN to talk to the DB. I had to install the SQL Server 2008 R2 Native Client on my new VUM server. If you have to as well, I'll save you the google and include the link HERE.
I didn't have to make service account as one was already created but I did have to give it a new password, give it Administrator privileges in vCenter AND the server running VUM. I had to make sure my service account had the DB Owner role for the database. I also had to give the VUM server a small amount of disk space to store patches & updates. If you're wondering how much space you'll need for VUM data VMware has a handy size estimator tool you can use.
Once you've got your DB made, service account permitted and your DSN made, you're ready to install or upgrade VUM. The install is pretty straight-forward. You'll specify the vCenter server information (you can use IP Address but I prefer to use a FQDN where possible) and the account credentials you want VUM to use to talk to vCenter, choose your DSN you made, choose how VUM looks on the network, set the paths for installation and patch storage (for which I made a small 10Gb V-for-VUM disk attached to the server), next, install, etc.
VUM doesn't have full functionality in the web-client so you'll need to open up the fat-client and use that. From the menu-bar at the top, click Plug-ins > Manage Plug-ins and you should see VMware Update Manager as an available plug-in. You can download & install it, which is also relatively uneventful. You'll likely see an error after installing the client plug-in. VUM for some reason installs and runs under a local system account on your VUM server so you'll see an error message complaining about connecting to VUM because the DB is unavailable. This is easily resolved by stopping the VUM service on your VUM server, setting the service to logon as your service account and then starting the service again. Head back into your plug-in manager in your vCenter fat-client, right-click the VUM plug-in and enable it. All's right in the world now.
You might notice that I'm upgrading hosts, VMtools and VM hardware in that order. I'm going about it in this order specifically because going out of order can cause problems. The VM hardware upgrade requires both a compatible VMtools install and a compatible ESXi version, so upgrading out of order could cause VMs not to run on your hosts right away, causing downtime for your company. Planning it out right might slow things down in the eyes of some but slow is smooth and smooth is fast.
The jist of how VUM works (without getting too in-depth) is that you create a baseline, attach that to an object in your virtual Data Center and scan that object. If it doesn't meet the baseline then VUM can remediate that object (EG, upgrade it, depending on the kind of baseline you created). You can create upgrade or patch baselines. In this post, I'm going to be making upgrade baselines but the process is the same for patch baselines. I'll have to write something going deeper into VUM after the dust settles with this project.
I first started trying to run through the VUM host/VM upgrades in our Test environment. I actually ended up running into an issue that only impacts Test for us. In Test, we still have a Nexus 1000v distributed virtual switch (dvs) which installs a VIB package on the Host. A VIB package is sort of like a driver package to handle a specific piece of hardware. The only difference in this case is that the hardware is virtual. The error I was getting when scanning the host against my host-upgrade baseline is that neither build of ESXi I used in my upgrade baselines had the Nexus 1000v VIB package so the host was deemed incompatible for that upgrade by VUM. Specifically, my error message would say "The upgrade contains the following set of conflicting VIBs:" which you can see in the screenshot below.
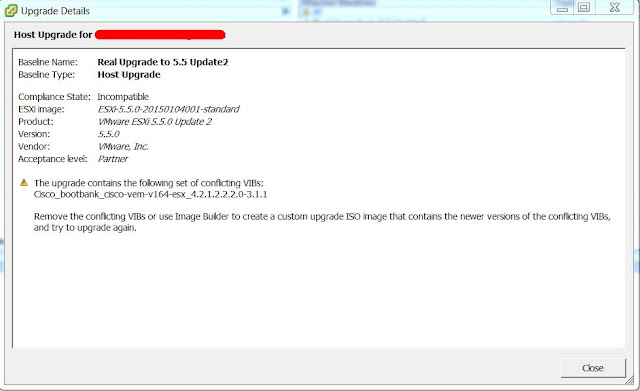
We originally had the Nexus 1000v in both our Prod an Test environments but there was some issue with it. Since we were undergoing some changes to who-does-what on our team, my supervisor (and previous VMware admin) decided to remove it until I could get up to speed with it and bring it back once we could fully take advantage of what it has to offer. He'd removed it from Prod but not from Test, so in order to proceed with this project I had to tear down the Nexus 1000v and migrate all of our Test VMs to a standard vSwitch (I'll dive deeper into vSphere networking in a later post.)
Using VUM to upgrade ESXi
The jist of how VUM works (without getting too in-depth) is that you create a baseline, attach that to an object in your virtual Data Center and scan that object. If it doesn't meet the baseline then VUM can remediate that object (EG, upgrade it, depending on the kind of baseline you created). You can create upgrade or patch baselines. In this post, I'm going to be making upgrade baselines but the process is the same for patch baselines. I'll have to write something going deeper into VUM after the dust settles with this project.
I first started trying to run through the VUM host/VM upgrades in our Test environment. I actually ended up running into an issue that only impacts Test for us. In Test, we still have a Nexus 1000v distributed virtual switch (dvs) which installs a VIB package on the Host. A VIB package is sort of like a driver package to handle a specific piece of hardware. The only difference in this case is that the hardware is virtual. The error I was getting when scanning the host against my host-upgrade baseline is that neither build of ESXi I used in my upgrade baselines had the Nexus 1000v VIB package so the host was deemed incompatible for that upgrade by VUM. Specifically, my error message would say "The upgrade contains the following set of conflicting VIBs:" which you can see in the screenshot below.

We originally had the Nexus 1000v in both our Prod an Test environments but there was some issue with it. Since we were undergoing some changes to who-does-what on our team, my supervisor (and previous VMware admin) decided to remove it until I could get up to speed with it and bring it back once we could fully take advantage of what it has to offer. He'd removed it from Prod but not from Test, so in order to proceed with this project I had to tear down the Nexus 1000v and migrate all of our Test VMs to a standard vSwitch (I'll dive deeper into vSphere networking in a later post.)
The error message above made me think that I needed to mess with the VIBs in the version of ESXi I was trying to upgrade TO rather than FROM. After poking around with Image builder in PowerCLI, I found that the issue was that the version of ESXi I was trying to upgrade FROM had the VIB listed in the error. If you're running into this issue and you want to keep the N1kv during your upgrade, you'll probably need to use Image Builder in PowerCLI and add the updated VIB to the offline bundle of whatever ESXi build you're using. If you're deciding to just ditch the N1kv for now and reintroduce it to your environment later like I am then there is a couple good guides I've found for properly removing it from your environment that I encourage you to checkout. I'm not going to discuss either option in-depth simply because they're outside of the scope of this project.
Once I got the N1kv dvSwitch removed from my test environment, I was able to successfully upgrade my test hosts and VMs before upgrading everything in production.
On one host, I did run into an instance where after upgrading ESXi using VUM, 2 out of the 3 VMs on that host showed as invalid. I went through some troubleshooting steps found on this page to no avail. I'm not blaming VUM or the ESXi upgrade specifically for this. According to the link, VMX files can corrupt after an HA host failure or when a host comes out of maintenance mode. I've never seen it but I guess it's a thing. After spending 2 hours on the phone with a Support Engineer from VMware, he determined that the VMX file may have somehow gotten corrupted and we created new VMs using the respective existing VMDKs. Doing this meant that the NIC in the Guest OS was wiped out (Literally. You don't even see a NIC until you interactively reinstall/upgrade VMTools on the guest, and only then can you reconfigure the network settings.). It made for a fun night/morning. /sarcasm
The process for Upgrading VMTools installs and VM Hardware versions looks a lot like upgrading your ESXi hosts so don't expect anything truly exciting and new here. Maybe I'm just an idiot but it took me a while to be able to attach the VM upgrade baselines to objects. I found I was only able to attach any VMTools or VM Hardware upgrade baseline to a folder object or VM object in the VMs & Templates view. I may have been doing it wrong but who knows?
When upgrading VMTools and VM Hardware, I did have to restart the VM. Rather, VUM did it for me and it was rather quick but I figured I'd warn anyone who might be confused as to whether or not either of these might need a reboot in order to complete the upgrade.
You might see on other guides saying that it's recommended to upgrade VMTools before upgrading VM Hardware version but if you're using VUM, you can't do it any other way.
Lastly, when you remediate a VM or multiple VMs, I highly recommend setting the VM Setting in VUM to take a snapshot before upgrading anything at the VM level and letting it automagically expire after X amount of hours.

I hope my information has helped someone out there on the internet. Stay tuned for the final part of this project where I'm using a VMware fling to convert our Windows vCenter install to the new Linux-based vCenter Server Appliance (VCSA).
On one host, I did run into an instance where after upgrading ESXi using VUM, 2 out of the 3 VMs on that host showed as invalid. I went through some troubleshooting steps found on this page to no avail. I'm not blaming VUM or the ESXi upgrade specifically for this. According to the link, VMX files can corrupt after an HA host failure or when a host comes out of maintenance mode. I've never seen it but I guess it's a thing. After spending 2 hours on the phone with a Support Engineer from VMware, he determined that the VMX file may have somehow gotten corrupted and we created new VMs using the respective existing VMDKs. Doing this meant that the NIC in the Guest OS was wiped out (Literally. You don't even see a NIC until you interactively reinstall/upgrade VMTools on the guest, and only then can you reconfigure the network settings.). It made for a fun night/morning. /sarcasm
Using VUM to upgrade VMTools & VM hardware version
The process for Upgrading VMTools installs and VM Hardware versions looks a lot like upgrading your ESXi hosts so don't expect anything truly exciting and new here. Maybe I'm just an idiot but it took me a while to be able to attach the VM upgrade baselines to objects. I found I was only able to attach any VMTools or VM Hardware upgrade baseline to a folder object or VM object in the VMs & Templates view. I may have been doing it wrong but who knows?
When upgrading VMTools and VM Hardware, I did have to restart the VM. Rather, VUM did it for me and it was rather quick but I figured I'd warn anyone who might be confused as to whether or not either of these might need a reboot in order to complete the upgrade.
You might see on other guides saying that it's recommended to upgrade VMTools before upgrading VM Hardware version but if you're using VUM, you can't do it any other way.
Lastly, when you remediate a VM or multiple VMs, I highly recommend setting the VM Setting in VUM to take a snapshot before upgrading anything at the VM level and letting it automagically expire after X amount of hours.

I hope my information has helped someone out there on the internet. Stay tuned for the final part of this project where I'm using a VMware fling to convert our Windows vCenter install to the new Linux-based vCenter Server Appliance (VCSA).

Comments
Post a Comment